
중요한건 꺾이지 않는 맥북
Kubeflow - Kubeadm K8s Single Cluster 본문
kubeflow 설치
- docker, helm, kustomize 설치 필요
- Kubernetes v1.22.7 version
- Kubeadm K8s Cluster
- 로컬환경이 아닌 LocalPC(Client)에서 Server VM에 요청하는 방식
Install Kubernetes - Kubeadm
- 모두의 MLOps의 Kubeadm 설치
- kubelet kubeadm kubectl install 하는부분을 sudo apt-get install -y kubelet=1.22.7-00 kubeadm=1.22.7-00 kubectl=1.22.7-00 로 변경
- flannel 설치하는 부분을 kubectl apply -f https://raw.githubusercontent.com/flannel-io/flannel/v0.20.2/Documentation/kube-flannel.yml 로 변경
- https://mlops-for-all.github.io/docs/setup-kubernetes/kubernetes-with-kubeadm/
4.3. Install Kubernetes - Kubeadm
1. Prerequisite # 쿠버네티스 클러스터를 구축하기에 앞서, 필요한 구성 요소들을 클러스터에 설치합니다. Install Prerequisite을 참고하여 Kubernetes를 설치하기 전에 필요한 요소들을 클러스터에 설치해
mlops-for-all.github.io
Install CSI Plugin : Local Path Provisioner
- https://mlops-for-all.github.io/docs/setup-kubernetes/install-kubernetes-module/ CSI Plugin : Local Path Provisioner 부분 참조
5. Install Kubernetes Modules
Install Helm, Kustomize
mlops-for-all.github.io
Install Kubeflow
1.6.0 버전 kubeflow git clone
git clone https://github.com/kubeflow/manifests.git
cd manifests
git checkout tags/v1.6.0
Install with a single command
while ! kustomize build example | kubectl apply -f -; do echo "Retrying to apply resources"; sleep 10; done
모든 Pod가 running이 되었다면,
kubectl get svc -n istio-system위 커맨드를 통해

istio-system Namespace의 service를 조회하여 istio-ingressgateway service의 80 포트포워딩 정보를 확인한다.
*이 때, istio-ingressgateway service의 TYPE이 LoadBalancer이고 EXTERNAL-IP가 pending인 경우,
kubectl edit service istio-ingressgateway -n istio-system

위 커맨드로 edit창을 연 뒤,

spec:
  clusterIP: 10.99.94.126
  clusterIPs:
  - 10.99.94.126
  ...
  selector:
    app: istio-ingressgateway
    istio: ingressgateway
  sessionAffinity: None
  type: NodePort #LoadBalancer를 NodePort 로 변경
status:
  loadBalancer: {}
type부분을 NodePort로 변경해준다.
그다음, Client에서 http://{SERVER IP}:{istio-ingressgateway service node-port}로 접속하면

dex 로그인 인증 화면을 볼 수 있고 기본 로그인 계정인 Email: user@example.com PW: 12341234를 통해 접속하면
Kubeflow Main DashBoard 화면이 뜬다.
Kserve
Install with a single command 단계에서 모든 컴포넌트를 build하면, 기본적으로 Kserve 관련 정보들도 build된다.
Kserve-inference tutorial
https://kserve.github.io/website/0.8/get_started/first_isvc/#2-create-an-inferenceservice
First InferenceService - KServe Documentation Website
First InferenceService Run your first InferenceService In this tutorial, you will deploy an InferenceService with a predictor that will load a scikit-learn model trained with the iris dataset. This dataset has three output class: Iris Setosa, Iris Versicol
kserve.github.io
위 url에서 볼수 있듯이, 나는 Create an InferenceService 부분의 코드를 통해 첫 InferenceService를 생성한다. 이 때, kubectl create namespace kserve-test 는 하지않고,
kubectl apply -n kubeflow-user-example-com -f - <<EOF
apiVersion: "serving.kserve.io/v1beta1"
kind: "InferenceService"
metadata:
  name: "sklearn-iris"
spec:
  predictor:
    model:
      modelFormat:
        name: sklearn
      storageUri: "gs://kfserving-examples/models/sklearn/1.0/model"
EOF
kubeflow-user-example-com Namespace에 적용할 것이다.
kubeflow-user-example-com Namespace에 적용하게 되면, Kubeflow Models UI에서
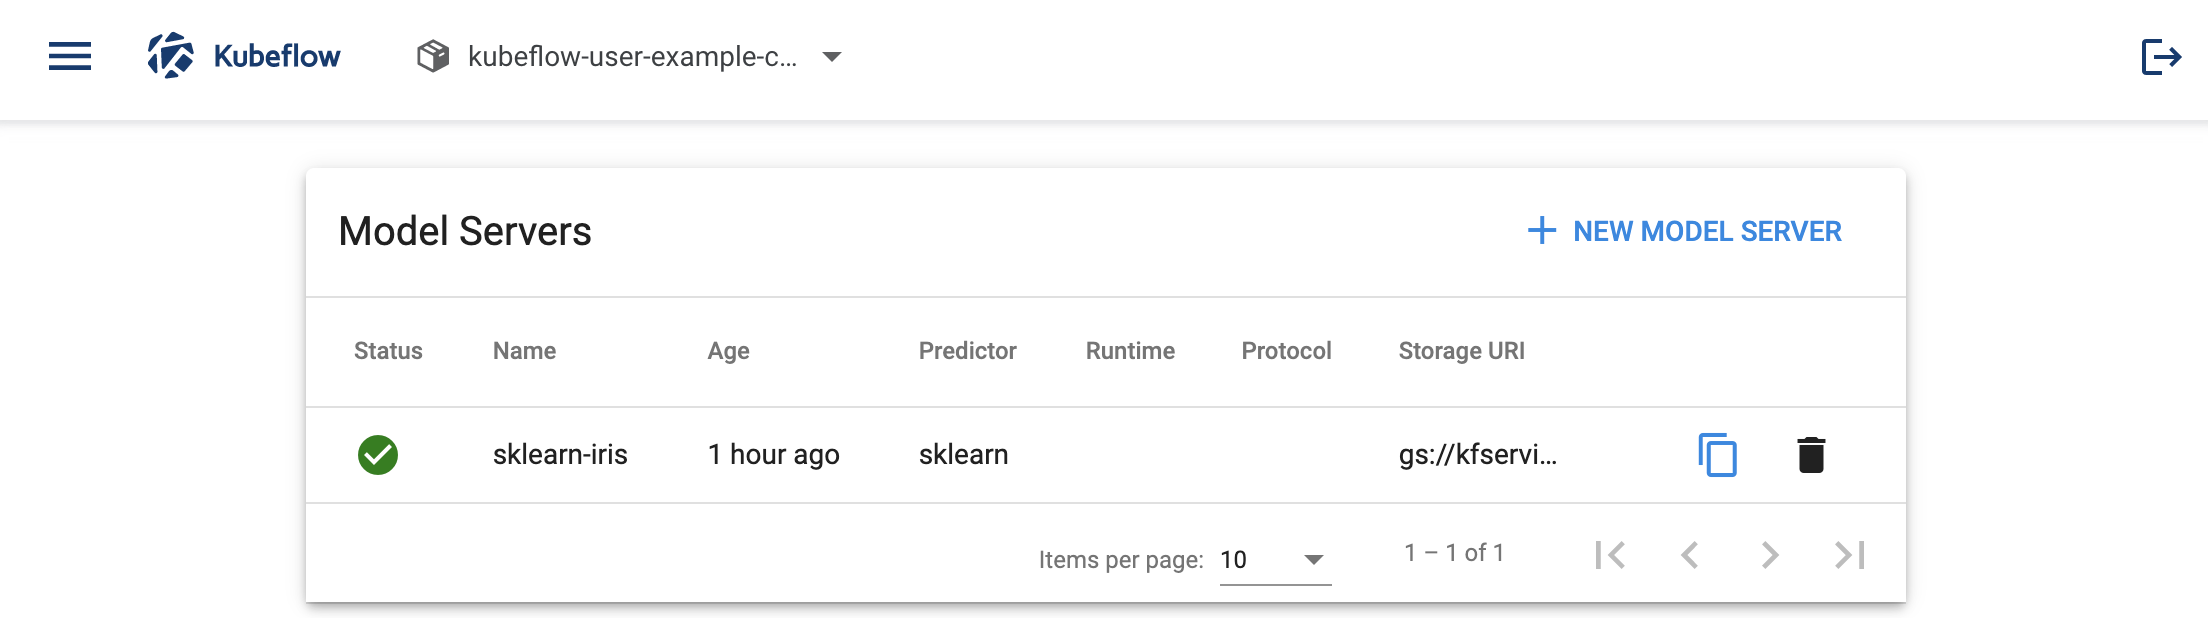
위와 같이, 방금 생성한 모델 정보를 볼 수 있다. 그리고, Postman과 같은 API 테스트 소프트웨어를 통해 inference request를 날려볼 수도 있다.
URL
- http://{SERVER IP}:{istio-ingressgateway service 80 port-fowarding port}/v1/models/{model name}:predict
Method
- POST
Headers
- Cookie: authservice_session={your kubeflow login authservice_session token}
- Host: kubectl get inferenceservice {model name} -n kubeflow-user-example-com 결과의 URL 정보
- json data.
- example: https://kserve.github.io/website/0.8/get_started/first_isvc/#5-perform-inference
First InferenceService - KServe Documentation Website
First InferenceService Run your first InferenceService In this tutorial, you will deploy an InferenceService with a predictor that will load a scikit-learn model trained with the iris dataset. This dataset has three output class: Iris Setosa, Iris Versicol
kserve.github.io
#curl example
curl --location --request POST 'http://xx.xx.xxx.xx:30193/v1/models/sklearn-iris:predict' \
--header 'Cookie: authservice_session=MTY3MzE2NjM4NHxOd3dBTkZCYVVVeERWalJPVlZsRldFWllTazlSU1U5VE1rSlhVa1ZCTkV0Tk0wZFVVRFZaVGxoS1VsZzNRbGhWVVZnMlJWTklRVUU9fPp3lqH4OaFrNt8Qf_ECrqGLIUknnK_0RzWdkiOXI-Wt' \
--header 'Host: sklearn-iris.kubeflow-user-example-com.example.com' \
--header 'Content-Type: application/json' \
--data-raw '{
  "instances": [
    [6.8,  2.8,  4.8,  1.4],
    [6.0,  3.4,  4.5,  1.6]
  ]
}'

# inference result response
{
    "predictions": [
        1,
        1
    ]
}
'MLOPS' 카테고리의 다른 글
| Minio와 Postgresql를 활용하여 Multi-Tenant MLflow 배포하기 (0) | 2023.05.13 |
|---|---|
| Kubeflow - Multi Tenancy(user) (0) | 2023.01.27 |
| kubeflow (0) | 2023.01.01 |
| CLOps-MLOps의 시작 (0) | 2022.08.13 |
| 모델 서빙을 하기 위한 필수 요소 및 빅테크 기업들의 기술 (0) | 2022.01.21 |


