Minio와 Postgresql 없이 MLflow 앱 배포하기
글을 작성하기 전에, 저는 현재 회사에서 주피터 노트북 앱을 배포하는 ML 플랫폼을 개발,운영하고 있습니다. MLOps 서비스도 추가하기 위해서 사용자별로 주피터 노트북을 띄워준 네임스페이스에 추가로 MLflow 서버도 배포할 계획이라서 현재 태스크를 진행중에 있습니다.
1. 각 주피터 노트북 서버 Pod가 띄워지는 네임스페이스에 MLflow 서버도 같이 띄웁니다.
2. MLflow Server가 Backend Store, Artifacts Store로 사용할 path를 nfs 서버와 마운트 합니다.
3. 클라이언트가 해당 네임스페이스에만 접근가능하도록 RBAC를 생성합니다.
MLflow Dockerfile
FROM python:3.7

RUN pip install mlflow==1.9.1
RUN pip install protobuf==3.19.0

WORKDIR /app

EXPOSE 5000

CMD mlflow server \
    --backend-store-uri $backend_store_uri \
    --default-artifact-root $default_artifact_root \
    --host 0.0.0.0
저는 python3.7, mlflow 1.9.1 버전으로 설치했습니다.
backend-store-uri 와 default-artifact-root 는 pod을 띄울때 지정한 env를 받도록 지정합니다.
MLflow Tracking Server를 생성하기 위한 오브젝트 명세
apiVersion: apps/v1
kind: Deployment
metadata:
  name: mlflow-deployment
  labels:
    app: mlflow
spec:
  replicas: 1
  selector:
    matchLabels:
      app: mlflow
  strategy:
    type: RollingUpdate
  template:
    metadata:
      labels:
        app: mlflow
    spec:
      containers:
      - name: mlflow
        image: mlflow-python:latest
        imagePullPolicy: IfNotPresent
        ports:
        - containerPort: 5000
        env:
        - name: backend_store_uri
          value: "sqlite:///mlflow.db"
        - name: default_artifact_root
          value: "/artifacts"
        volumeMounts:
        - name: backend-store-volume
          mountPath: /app
          readOnly: false
        - name: artifacts-volume
          mountPath: /artifacts
          readOnly: false
      volumes:
      - name: backend-store-volume
        nfs:
          path: {mount-path}/postgresql
          server: {nfs-server-address}
      - name: artifacts-volume
        nfs:
          path: {mount-path}/artifacts
          server: {nfs-server-address}
---
apiVersion: v1
kind: Service
metadata:
  name: mlflow-service
spec:
  selector:
    app: mlflow
  ports:
    - protocol: TCP
      port: 80
      targetPort: 5000
  type: ClusterIP
MLflow 서버를 띄우기 위한 deployment와 외부에서 접속하기 위한 service 오브젝트의 명세입니다.
backend-store-uri 와 default-artifact-root 는 컨테이너의 env 필드에 각각 지정해줍니다.
볼륨 마운트를 위한 volumes 필드에는 nfs 서버 마운트를 하기위해 위와같이 server와 path를 명시해줍니다.
MLflow Tracking Server에 외부에서 접속하기 위한 RBAC 생성 오브젝트 명세
apiVersion: rbac.authorization.k8s.io/v1
kind: Role
metadata:
  name: namespace-superuser
  namespace: {jupyterhub user namespace}
rules:
- apiGroups: [""]
  resources: ["*"]
  verbs: ["*"]
---
apiVersion: rbac.authorization.k8s.io/v1
kind: RoleBinding
metadata:
  name: namespace-superuser
  namespace: {jupyterhub user namespace}
roleRef:
  apiGroup: rbac.authorization.k8s.io
  kind: Role
  name: namespace-superuser
subjects:
- kind: ServiceAccount
  name: {jupyterhub user} # 기존에 네임스페이스에 있던 SA 그대로 사용했음
  namespace: {jupyterhub user namespace}
Service Account는 기존에 생성되었던 Jupyterhub user 네임스페이스에 생성되어 있던 SA를 그대로 사용했습니다.
위와 같이 mlfow 서비스를 띄우게 되면, pod을 내렸다가 다시 띄워도 /app에 마운트를 하게 되면, 기존 데이터를 다시 불러와서 사용 가능하게 됩니다.
https://{masternode-ip}:6443/api/v1/namespaces/{네임스페이스}/services/mlflow-service/proxy/
위 주소에
request header의 Authorization 필드에 위 RBAC 에서 사용한 SA의 secret 토큰을 넣어서 웹에서 접속하면 정상적으로 접근이 가능합니다.(저는 크롬 확장프로그램인 ModHeader를 사용했습니다.)
자 이제, 위와 같이 MLflow 서버가 띄워졌으면 MLflow client API로 MLflow server에 CRUD를 할 수 있습니다.
MLflowClient로 experiment 생성
from pathlib import Path
from mlflow.tracking import MlflowClient

# Create an experiment with a name that is unique and case sensitive.
client = MlflowClient("http://mlflow-service.{namespace}.svc.cluster.local") #mlflow를 띄웠던 서비스의 도메인 주소
experiment_id = client.create_experiment(
    "Social NLP Experiments"
)
client.set_experiment_tag(experiment_id, "nlp.framework", "Spark NLP")

# Fetch experiment metadata information
experiment = client.get_experiment(experiment_id)
print("Name: {}".format(experiment.name))
print("Experiment_id: {}".format(experiment.experiment_id))
print("Artifact Location: {}".format(experiment.artifact_location))
print("Tags: {}".format(experiment.tags))
print("Lifecycle_stage: {}".format(experiment.lifecycle_stage))
MLflow 모델 등록하기
from sklearn.datasets import load_iris
from sklearn.model_selection import train_test_split
from sklearn.preprocessing import MinMaxScaler
from sklearn import preprocessing
from sklearn import datasets
from sklearn.preprocessing import LabelBinarizer
from sklearn.ensemble import RandomForestRegressor
import warnings
import argparse
import json
import requests
import pickle
import os
import pandas as pd
import numpy as np
import mlflow
import mlflow.sklearn
warnings.filterwarnings(action='ignore')
mlflow.set_tracking_uri("http://mlflow-service.{namespace}.svc.cluster.local")
print(mlflow.__version__)
mlflow.set_experiment("test_experiment")
params = {"n_estimators": 3, "random_state": 42}
with mlflow.start_run(run_name="test") as run:
# parameter
mlflow.log_params(
{
"epochs": 10,
"optimizer": "adam",
}
)
model = RandomForestRegressor(**params).fit([[0, 1]], [1])
# metric tracking
mlflow.log_metrics(
{
"test_loss": 123,
"test_accuracy": 123,
}
)
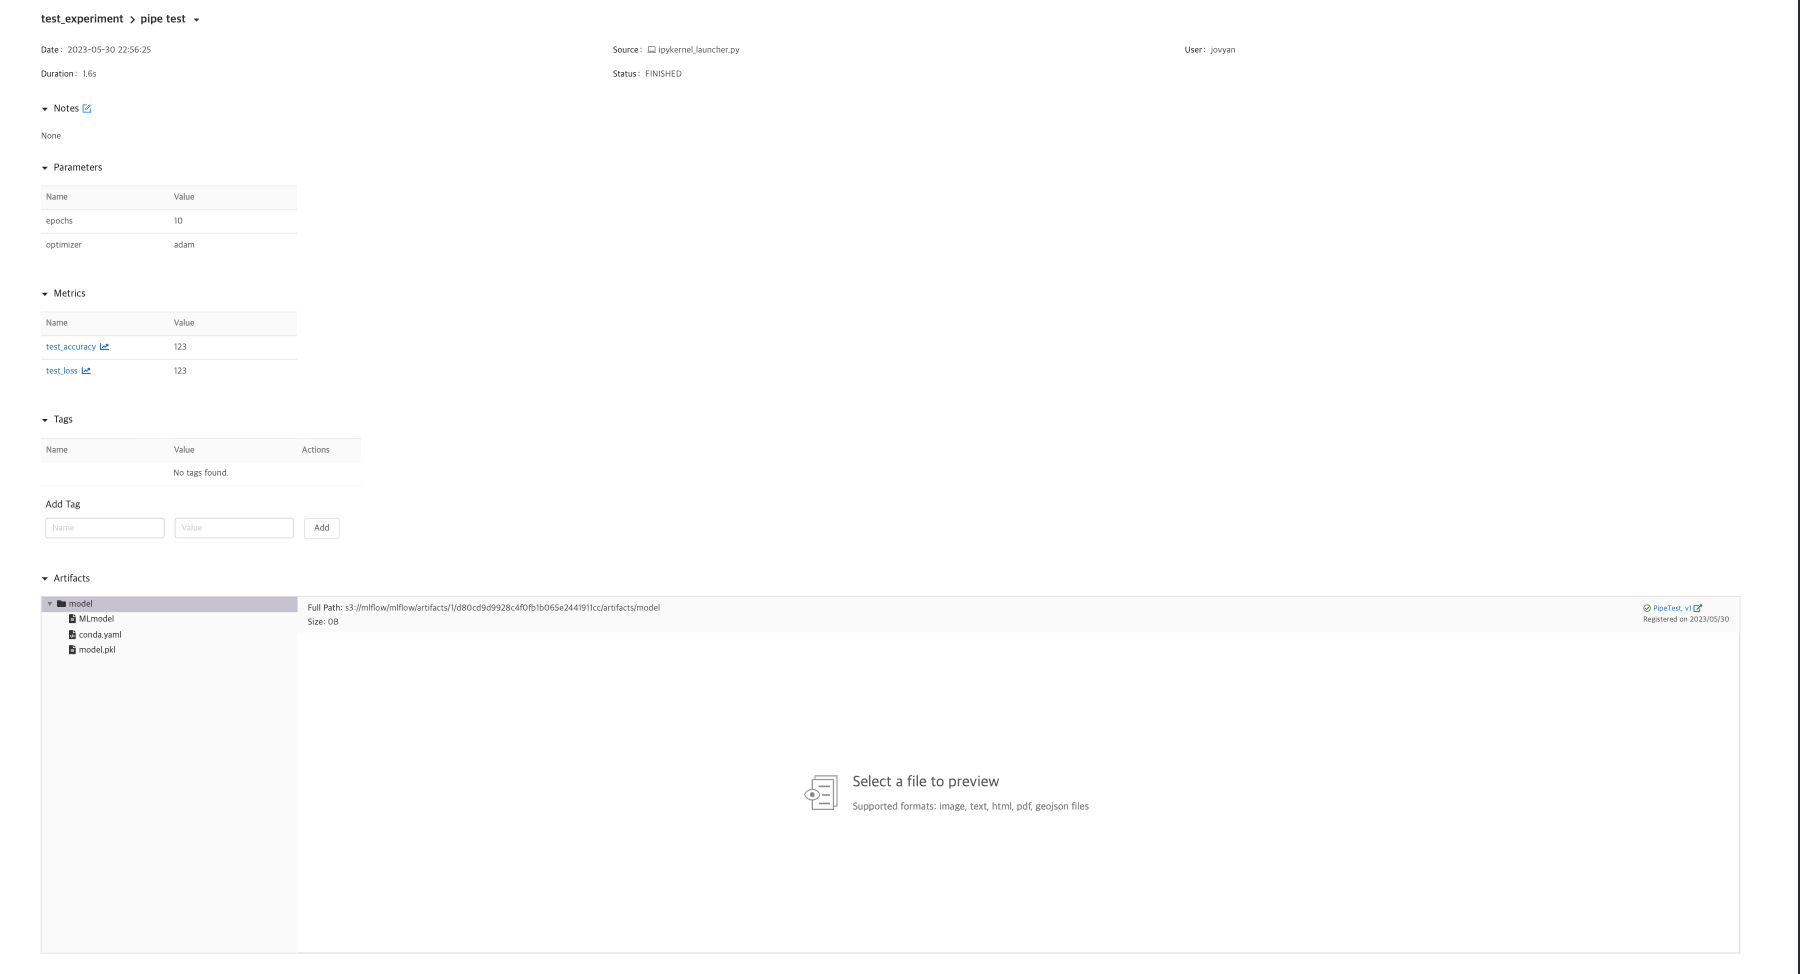
mlflow.sklearn.log_model(model, "model", registered_model_name="test")
print("Model saved in run %s" % mlflow.active_run().info.run_uuid)
DATE: 5.31 트러블 슈팅
위와 같이 mlflow 서버에 파일을 쓰려고 했는데 "/artifacts" Permission denied 에러가 났습니다.
저는 당연히 mlflow 서버를 띄운 컨테이너에 /artifacts로 파일이 써지는 줄 알았는데 제 로컬에 쓰려고 시도를 합니다. (???)
따라서, 저는 일단 로컬에 /artifacts 폴더를 생성하고 다시 시도했는데 로컬에 파일이 아래와 같이 정상적으로 써졌습니다.
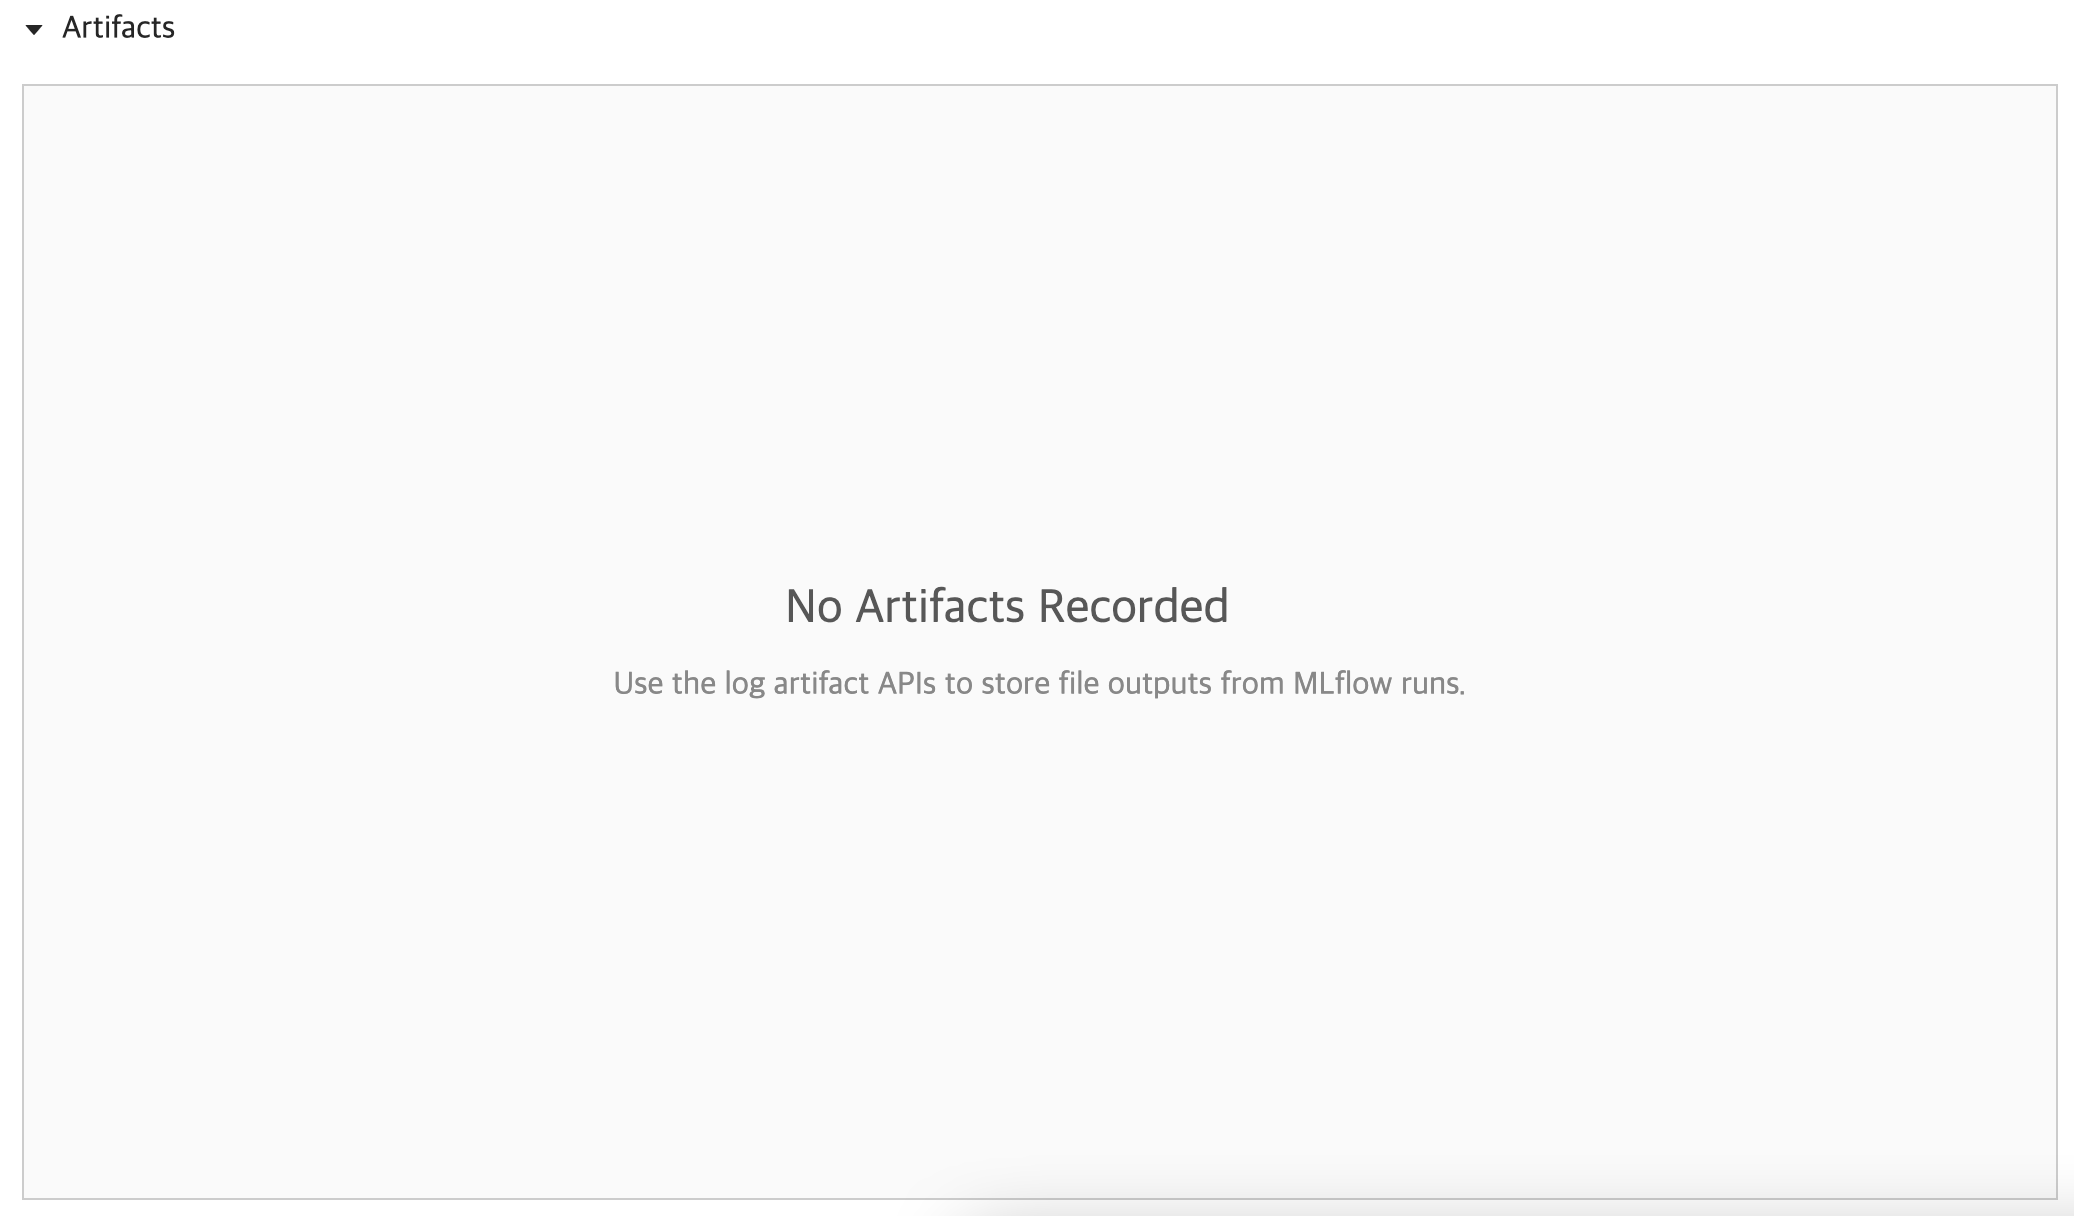
mlflow 서버에서 확인해보니 RUN은 정상적으로 돌았는데, 아래와 같이 artifacts가 없다는 이슈가 발생했습니다.
뭔가, Minio를 아티팩트 저장소로 썼을 때에는
os.environ["MLFLOW_S3_ENDPOINT_URL"] = f"http://minio-service.minio.svc.cluster.local:9000"
와 같은 환경변수 설정을 해줬었는데, 위와 같이 파일시스템으로 할때에는 별도로 지정해주지 않는 것이 의심스러웠습니다.
그래서 저는 다시 Artifacts 저장소는 Minio와 연동하였고, Backend DB 서버만 sqlite로 띄웠습니다.
MLflow Dockerfile
FROM python:3.7-slim-buster

# Build dependencies
RUN apt-get update -y && \
    apt-get install -y --no-install-recommends build-essential libpq-dev

ENV AWS_BUCKET mlflow
ENV AWS_ACCESS_KEY_ID minio
ENV AWS_SECRET_ACCESS_KEY minio123
ENV MLFLOW_S3_ENDPOINT_URL http://minio-service.minio.svc.cluster.local:9000
ENV PORT 5000

EXPOSE $PORT

RUN mkdir -p /tmp/mlflow
ENV MLFLOW_BACKEND_STORE_URI sqlite:///tmp/mlflow/mlflow.db

ARG MLFLOW_VERSION=1.9.1
RUN python -m pip install --upgrade pip && \
    pip install --no-cache-dir mlflow==$MLFLOW_VERSION boto3 psycopg2-binary && \
    pip install protobuf==3.19.0

ENTRYPOINT ["mlflow server --backend-store-uri $MLFLOW_BACKEND_STORE_URI --default-artifact-root S3://$AWS_BUCKET/mlflow/artifacts --host 0.0.0.0 --port $PORT"]
MLflow deployment object
apiVersion: apps/v1
kind: Deployment
metadata:
  name: mlflow-deployment
  labels:
    app: mlflow
spec:
  replicas: 1
  selector:
    matchLabels:
      app: mlflow
  strategy:
    rollingUpdate:
      maxSurge: 25%
      maxUnavailable: 25%
    type: RollingUpdate
  template:
    metadata:
      labels:
        app: mlflow
    spec:
      containers:
      - env:
        - name: MLFLOW_BACKEND_STORE_URI
          value: sqlite:///tmp/mlflow/mlflow.db
        - name: MLFLOW_S3_ENDPOINT_URL
          value: http://minio-service.minio.svc.cluster.local:9000
        - name: AWS_ACCESS_KEY_ID
          value: minio
        - name: AWS_SECRET_ACCESS_KEY
          value: minio123
        - name: AWS_BUCKET
          value: mlflow
        image: mlflow:latest
        imagePullPolicy: IfNotPresent
        name: mlflow
        ports:
        - containerPort: 5000
          protocol: TCP
        resources: {}
        terminationMessagePath: /dev/termination-log
        terminationMessagePolicy: File
        volumeMounts:
        - mountPath: /tmp/mlflow
          name: backend-store-volume
      dnsPolicy: ClusterFirst
      restartPolicy: Always
      schedulerName: default-scheduler
      securityContext: {}
      terminationGracePeriodSeconds: 30
      volumes:
      - name: backend-store-volume
        nfs:
          path: {mount-path}
          server: {nfs-server-address}
이제 "MLflow 모델 등록하기"의 코드를 다시 돌려보면 아래와 같이 파일이 잘 써지는 것을 확인할 수 있습니다!!!